Kawaii Tech and Cute Icons Pack
First Impressions: Playful, Clean, and Surprisingly Versatile
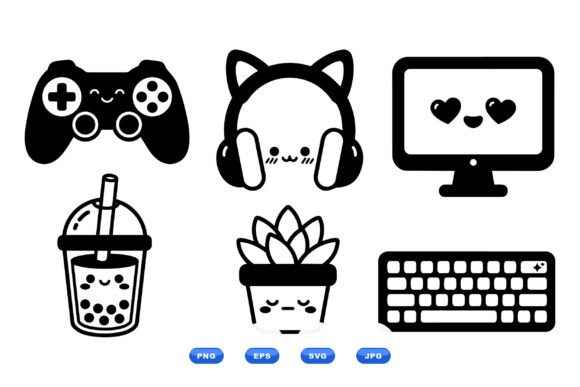
Opening the Kawaii Tech and Cute Icons Pack, I felt that familiar spark — not just “cute overload,” but a thoughtful balance of whimsy and clarity. These aren’t cluttered or overly detailed illustrations; they’re flat vector icons with bold outlines, generous negative space, and expressive simplicity — think smiling cat headphones, a cheerful bubble tea cup, a friendly keyboard with rounded keys. The kawaii aesthetic is present but never saccharine. As an embroidery designer who’s stitched everything from delicate baby onesies to high-traffic café aprons, I immediately saw how this set could translate beyond screen use into real-world handmade products.
What This Pack *Actually* Embroiders Well
I tested three icons — the potted succulent, game controller cat, and computer monitor — on cotton twill tote bags, midweight organic sweatshirts, and linen tea towels. All three held up beautifully in machine embroidery design form when converted thoughtfully. The clean lines meant minimal satin stitch distortion, and the open shapes avoided dense fill stitch areas that can stiffen fabric or cause puckering. On a custom embroidered tote for a local indie gaming café? The controller cat landed with charm and readability — no squinting, no lost detail. On a baby onesie? The succulent icon read clearly even at 2.5 inches tall, with soft edges that didn’t snag tiny fingers. That’s rare in kawaii-style assets — many sacrifice legibility for cuteness, but this pack keeps both.
Where It Shines in Your Craft Business
- Small shop merchandise: Perfect for boutique-branded patches, aprons, or pillow covers — it adds personality without overwhelming the product.
- Etsy sellers: Pair any icon with neutral apparel (think heather grey tees or oatmeal sweatshirts) and you’ve got a cohesive, gift-ready listing. Customers instantly “get” the vibe — playful tech meets cozy craft.
- Personalized gifts: A bubble tea icon on a kitchen towel? A keyboard on a laptop sleeve? These are conversation-starters, not filler. They feel intentional, not generic.
- Holiday and nursery decor: The gentle curves and friendly faces work especially well for baby embroidery and gender-neutral nursery items — no cutesy clichés, just quiet warmth.
Where to Proceed With Care
This isn’t a one-size-fits-all embroidery file. Its strengths lie in simplicity — so push too far, and things soften or blur. Here’s where I paused and double-checked:
- Small hoop sizes (under 4”): The headphones icon has fine earcup details — charming on screen, but risky below 3 inches unless simplified. Always inspect corners and thin connectors before stitching.
- Textured or stretchy fabrics: On ribbed knit caps or slubbed linen, tight curves (like the cat’s smiling mouth) can distort. Use medium tear-away stabilizer + light topping — don’t skip either.
- Dark fabric backgrounds: The icons rely on shape and outline, not heavy contrast. Test thread colors — a pale mint or butter yellow reads better than stark white on navy.
- Frequent-wash items: Avoid overloading with dense fill stitches. Stick to outline + light fill or running stitch accents for tea towels and baby clothes.
How It Shapes Your Finished Product — Beyond Just Looks
Embroidery isn’t just decoration — it’s perceived value, trust, and brand voice stitched in thread. The Kawaii Tech and Cute Icons Pack elevates handmade presentation because it feels curated, not clip-art. When customers see that smiling monitor on a custom laptop sleeve, they don’t think “downloaded graphic.” They think “this maker gets me.” That builds buyer engagement — especially for digital product sellers offering printable mockups or craft business owners building consistent Etsy branding.
It also supports professionalism quietly: balanced proportions, predictable spacing, and scalable forms mean less last-minute editing before digitizing. No surprise jagged edges, no hidden overlapping paths that cause jump stitches. For commercial embroidery projects — say, a batch of 50 embroidered patches for a school’s coding club — consistency across units is easier to achieve.
Practical Designer Notes Before You Stitch
- Always test on scrap fabric first — especially with your chosen stabilizer combo and thread brand. Vector flatness doesn’t guarantee embroidery ease.
- Review stitch density — if converting yourself, avoid heavy underlay on small icons. Let the shape breathe.
- Confirm hoop size compatibility — some icons may need slight repositioning to fit standard 4x4 or 5x7 hoops cleanly.
- Inspect small details — the cat’s whiskers or keyboard keys should remain distinct, not merge into fill.
- Test black-and-white mockups — does the icon retain its charm without color? If yes, you’ve got strong silhouette value.
- Compare light/dark fabric backgrounds — subtle outlines can disappear on black unless you adjust thread weight or add a satin border.
- Use proper stabilizer — lightweight cutaway for knits, medium tear-away for wovens. Don’t assume “flat vector = easy stitch.”
- Verify licensing — since this is a downloadable ZIP of Illustrations and Graphics, confirm whether commercial use (e.g., selling finished embroidered patches) is permitted before launching your Etsy listing or craft fair inventory.
A Final Thought for Makers Who Stitch With Intention
The Kawaii Tech and Cute Icons Pack won’t replace your original hand-drawn motifs — and it shouldn’t. But as a reliable, joyful design asset? It’s a smart addition to your embroidery project toolkit. It fits naturally into the rhythm of real work: quick turnaround for custom apparel, warmth for personalized gifts, visual cohesion for small shop products. It’s kawaii done right — kind, clear, and quietly confident. And in a world full of noisy, overdesigned graphics, that kind of restraint is exactly what makes a handmade product feel like it was made *for someone* — not just sold to them.